 With approximately half a billion registered users and counting, Google Plus is now the world’s second-largest social networking site, just a little over two years after its launch. In those couple of years, Google Plus has evolved from a simple social networking site to a popular platform for promoting business, just like Facebook and Twitter have done before it.
Whatever your products or services, you can be sure that your business will be brought to a wider audience if you create a Google Plus business page. Here’s how to do it, step-by-step.
1. Create a personal Google Plus Profile
Before you can go about creating a Google Plus business page, you have to create a personal Google Plus profile first. Click here to create your personal Google Plus profile. If you already have one, you can proceed to the next step.
2. Choose the proper category for your business
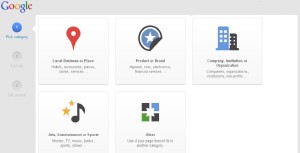
Go to the create a business page on Google Plus, and click on a category that you believe fits your business or organization perfectly. The choices you have are local business or place; product or brand; company, institution or organization; arts, entertainment or sports and other if any of the above are not applicable to your business.
Once you’ve chosen a main category, a drop-down menu will appear presenting you with sub-categories which allow you to describe your business in greater detail. These menus may vary depending on the main category you’ve selected. Let’s assume you picked “Local Business or Place” as your main category. The menu will then ask for the country where your business is based, as well as a primary telephone number. Meanwhile, if you’ve clicked on company, institution or organization, you’ll see subcategories which include aerospace and defense, auto, banks and financial etc. Choose your appropriate subcategory and click on “next”.
3. Add basic information
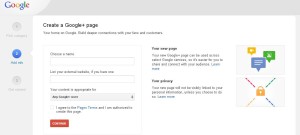
When you’re done choosing the right subcategory for your business, you can proceed to the add info page and add basic information about your business there. Start by picking a name for your page, and if you have a website, put in a link to it. While a website is not really a requirement here, it would certainly help to have one, because a site detailing what you can offer can boost the image of your business.
Right below that field is a menu that allows you to set whom your page is appropriate for. The choices include “any Google Plus user,” “users 18 and older,” “users 21 and older” or “alcohol related” content.
The last thing you need to do for the add info page is to check the box next to “I agree to the Pages Terms and I am authorized to create this page.” It is advisable to actually read the Google Plus Pages Terms so you’ll have an awareness of its guidelines on Authority, Access, Content, Data, Contests and Suspension & Termination.
When you’re done, click “continue” and begin customizing your page.
4. Customising Google Plus Business Page
Adding a profile and cover photo gets you started with customizing your Google Plus Business Page. To add a profile picture, just click on the camera icon in the default profile picture and select an image from your computer, from your own Google Plus personal profile, or from Picasa if you already have an account in the photo sharing service. The same procedure goes for cover pictures, which are so much larger than profile pictures. That makes them perfect for promoting and enhancing your business in the same way a billboard does. For a cover photo, it is recommended that you choose an image of your company, brand or product.
The next step is to fill the field that says “Story”. You are allowed ten words to describe your business the best way you can. Do this smartly and carefully, because as far as Google Plus users are concerned, those ten words will be the tagline for your business. Make sure that your tagline is consistent with other taglines you have written on other sites for branding purposes. Then you provide the necessary contact information, including phone, mobile, pager, fax, email, chat and business address. Complete the customization of your Google Plus Business Page by clicking on “Finish”
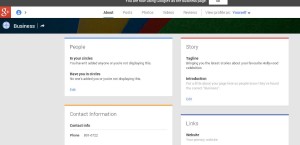
With all the basic information filled in, you can now manage your Google Plus business page using the administration dashboard. If you have any additional info about your page, just click the “About” section and make your entries there.
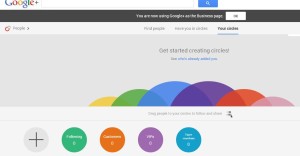
Building your network comes next. To establish how your business page appears to other Google Plus users, edit the “People” section and start grouping your page fans once you get them. You can group them under customers, following, team members and VIPs. You will also know when other Google Plus users add your business page to their circles. As a matter of courtesy, follow those who have added your page back to their pages and become a follower of their pages yourself.
At this stage, adding an introduction to your page is recommended. To do this, all you need to do is edit your Story. Incorporate important keywords into your introduction, which should focus on what your business is all about and everything it has to offer.
You can still edit your contact information if you need to. Putting in links is also recommended. Those links could be to your other social network accounts, stuff that is related to your business or even things that you’re interested in.
5. Sharing Content
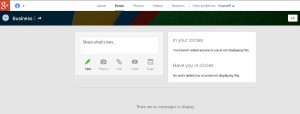
Now you’re ready to post on your Google Plus business page. Just like with your personal Google Plus profile or your Facebook page, you can post and share photos, videos, links. Anything you post can be shared with people in different circles. Also, take note of the navigation tabs just below your Google Plus business page name. These tabs, namely About, Posts, Photos, Videos and Reviews, are visible to anyone who visits your page, and they make it easier for your fans or followers to interact and engage on your page.
To create your own circle, hover your mouse pointer on the Google+ icon to the left of your screen. When the sidebar menu pops up, click on “People”. There are four default circles and one blank circle that you can use to create your own circle. You can drag your fans into any of these circles. This section will also let you know which Google Plus users have added your business page to their own circles.
Always remember that you created this page to promote your business, and one of the best ways to give a good impression is to interact with your fans. So always make time to engage them by following their posts, commenting on their status messages and +1 their updates using your page profile. Of course, your own posts should not be just promotional. You would do well to share content that your fans will find relevant and useful.
Setting up your own Google Plus Business Page is only the beginning. There is still a lot to learn about increasing your page’s chances of ranking highly in Google’s local search results, among other things. Learn as much as you can about optimising your Google Plus Business Page, and you will manage to stay one step ahead of other small businesses.

